A beginner's guide to using AutoPkg with GitLab Runner
I had a rude awakening during an upgrade process, where I decided to upgrade my Test and Prod AutoPkg Runner Mac minis from Mojave to Catalina.
Though my AutoPkg needs are relatively simple and standard, I’ve been using a locally installed Jenkins service on both computers to run AutoPkg, mainly to gain the benefit of scheduling, and a graphical log history with obfuscated credentials.
I was probably Doing It Wrong™️, but Jenkins is an odd product to install on macOS. At the time of installation, it creates a hidden user with a user ID in the 200s. It’s not supposed to be a user that you log into at the login prompt, but I could never get it working as a local service without doing that, and giving the user admin rights. Its home direectory is also placed in /User/Shared. Strange stuff.
Anyway, upon upgrading the Test Mac to Catalina, the Jenkins user disappeared. It turns out that the UID is now needed by an Apple service. I was able to create a new Jenkins user and chown my way out of the problem.
I decided to prevent the same issue on the Prod server by changing the UID of the Jenkins user to a sensible number above 500, and do the chowning before upgrade. This worked, but for some reason, after trying everything I could think of, I could not get the Jenkins web service to run as a service.
Fed up with the saga, I started looking for an alternative. I could just use a LaunchDaemon, for example set something up like @rtrouton’s AutoPkg Conductor, but I would have to handle the issue of credentials. I also looked at running Jenkins in Docker, but that had multiple challenges.
Then, this conversation in the #ci MacAdmins Slack channel:
So, thanks to @macjustice I’ve now transferred to using GitLab. For now, I use it in a similar way to how I was using Jenkins, but with the advantage that I do not have to maintain the GitLab service which is already offered as a supported service by my organisation.
This is a very basic guide to how I set up my two Mac minis with the agents, and what it does. Please take it as a journal rather than Best Practice! I knew nothing about this a week ago.
UPDATE: Allister Banks kindly pointed out Rick Heil’s 2017 blog post and a section of his PSU MacAdmins 2017 talk about setting up AutoPkg with GitLab CI, which uses a more advanced workflow than I present here.
Setting up a GitLab repo for the Runner service
A GitLab Runner service comprises of a repo on the GitLab server containing a command file, and any other files that might be needed in the run. An agent, or “Runner”, is installed on computers on which the commands should be run. The command file is in YAML format, is called .gitlab-ci.yml, and should live in the root of a repository.
I decided to put my recipe lists and associated scripts in the same repo, though they could be kept in separate repos.
So, create a repo on GitLab, and clone it ready for editing.
Installing the Runner agent
Installing the agent is well documented - Documentation on installing the GitLab Runner on macOS
In short:
- Run this command:
sudo curl --output /usr/local/bin/gitlab-runner https://gitlab-runner-downloads.s3.amazonaws.com/latest/binaries/gitlab-runner-darwin-amd64
sudo chmod +x /usr/local/bin/gitlab-runner
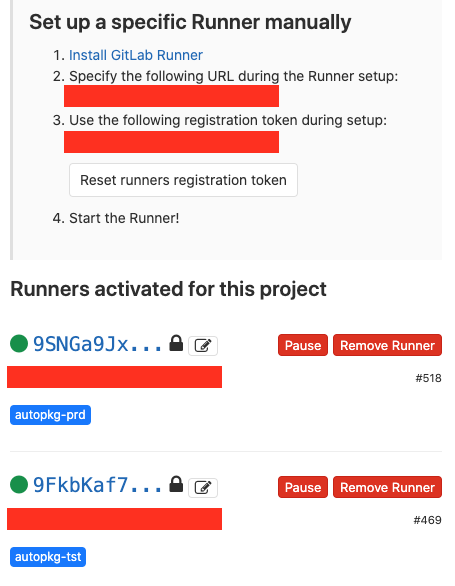
- Go to the project’s Settings > CI/CD and expand the Runners section.
- In the section “Set up a specific Runner manually”, you’ll see a URL and a registration token.
- Run this command to register the Runner, which starts an interactive setup dialogue - see Documentation on registering a specific Runner for more details, and be careful not to run this command as
sudoas in the Linux instructions:gitlab-runnerruns as the user on macOS:
gitlab-runner register
- Enter your GitLab instance URL:
Please enter the gitlab-ci coordinator URL (e.g. https://gitlab.com)
https://gitlab.example.com/
- Enter the token you obtained to register the Runner (same token for each Runner):
Please enter the gitlab-ci token for this runner
XXXXYYYYaaaabbbbcccc
- Enter a description for the Runner, you can change this later in GitLab’s UI:
Please enter the gitlab-ci description for this runner
autopkg-tst-mac.example.com
- Enter the tag(s) associated with the Runner, you can change this later in GitLab’s UI.
- A tag identifies each Runner in your command file. Jobs are associated with particular tags, and in this way, you can maintain a single command file that triggers jobs on multiple computers.
Please enter the gitlab-ci tags for this runner (comma separated):
autopkg-tst
- Enter the Runner executor. In this case we are running directly in the shell:
Please enter the executor: ssh, docker+machine, docker-ssh+machine, kubernetes, docker, parallels, virtualbox, docker-ssh, shell:
shell
- Now, install and start the Runner:
gitlab-runner install
gitlab-runner start
- Go to the project’s Settings > CI/CD and expand the Runners section.
- Click the pencil button next to the Runner you have started.
- Check the Lock to current projects option, and click Save changes.
- Hopefully, the blob next to the Runner is showing green. In which case it’s ready to receive commands.
In my case, I set up Runners on two Macs, the Test and Prod servers. The tags are shown in blue.
Variables
Now, we need to actually write the command file. The file can refer to variables which are stored in the GitLab settings section, as well as some global variables. I refer to $CI_PROJECT_DIR which is the root of the repo. I also need to pass usernames and passwords into the autopkg command to connect to SharePoint, so I define these in Settings > CI/CD in the Variables section. You can choose whether to mask the value of the variable, useful for passwords. Note that there are some requirements of the string in a masked variable that you may have to change the password to meet.
The command file
the complete command file defines a pipeline. My .gitlab-ci.yml file contains four stages. The first item in the file lists theses stages. Each stage is run in turn. Multiple jobs can be assigned to each stage. If so, the jobs will run concurrently. My workflow requires that the Test server jobs run before the Prod server jobs, so I kept a different stage for each job.
stages:
  - staging-tst
  - testing-tst
  - staging-prd
  - testing-prd
Next, I define a before_script, which is a command that will run at the start and is automatically assigned to all tags, so in my case will run on both computers. You could just as easily put this within a normal job:
before_script:
  - /usr/local/bin/autopkg repo-update all
Finally, we define each job in turn. A job is given any unique name you want. A job has a few definitions to set:
- Which
stageit should run under, which should match one of the items in thestageslist. - Which
tagsit is associated with (i.e. which computers/Runners it will be run on), - Whether to
allow-failure. If this is defined (set toTrue), subsequent jobs/stages will continue if this job fails. If you do not defineallow-failure, or set it toFalse, no more jobs will run after this failed job. - The
scriptsection. This is a list of commands you want to run on the computer the Runner is running on. We set the Runner to theshellmode, so these should bebashorzshcommands, or paths to scripts on the computer.
Here’s the first of the four very similar jobs in my file. You can see it runs two commands, one is my script that generates a dynamic recipe list from trusted recipes, and the second is a direct autopkg run command. Commands can split lines in the file without having to escape carriage returns, just ensure to align them properly. All the variables here are stored in GitLab, except $CI_PROJECT_DIR which as already stated is the root of the repo. I store my recipe lists and scripts in the root of this repo.
job prod tst:
  stage: staging-tst
  tags:
    - autopkg-tst
  allow_failure: True
  script:
    - $CI_PROJECT_DIR/verify-trust-info.sh
      --recipe-list "$CI_PROJECT_DIR/JSS_AutoPkg_Prod_Recipe_List.txt"
      --trusted-recipe-list "$CI_PROJECT_DIR/AutoPkg_Trusted_Prod_Recipe_List.txt"
    - /usr/local/bin/autopkg run -v
      --recipe-list "$CI_PROJECT_DIR/AutoPkg_Trusted_Prod_Recipe_List.txt"
      --post ch.ethz.id.postprocessors/SlackerProd
      --post ch.ethz.id.postprocessors/Policytool
      --post ch.ethz.id.postprocessors/PolicyDeleter
      --key SP_URL=$SP_URL
      --key webhook_url=$SLACK_WEBHOOK_TST
      --key SP_USER=$SP_USER
      --key SP_PASS=$SP_PASS
      --key server="id-jamf-tst"
      --key KEYCHAIN_PASS=$KEYCHAIN_TST_PASS
No need for me to show all four jobs, just to say that the things that change are just the job name, the stage, and the tag. I set allow_failure: True in all jobs as I want all the autopkg recipes to run regardless of whether any recipes fail.
In the CI/CD section of your repo, there is a useful CI Lint button in the top right corner. Post your .gitlab-ci.yml file contests here to ensure that you’ve written acceptable YAML.
Running, monitoring and scheduling pipelines
When you push a commit to the repo, the pipeline should immediately start. To monitor a running pipeline or job, go to the CI/CD section of your repo, and click on Pipelines or Jobs. You will see which jobs are running, passed or failed. None of my pipelines will fail - since I set allow_failure: True, all pipelines pass regardless.
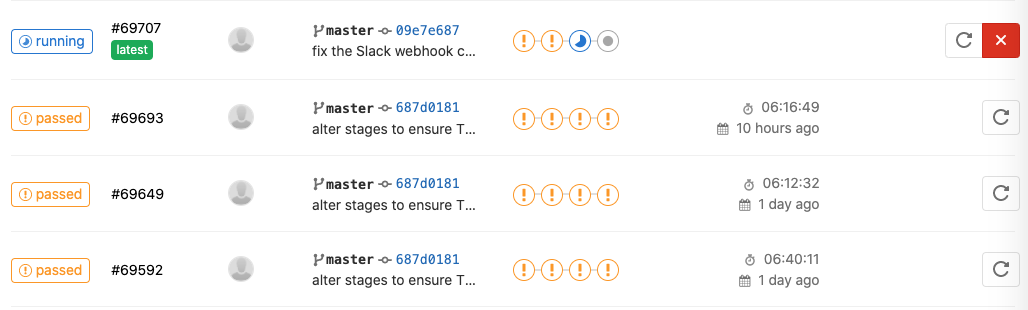
However, in the Jobs section you can see if your jobs failed. All mine are failing at the moment due to a couple of recipes that need attention.
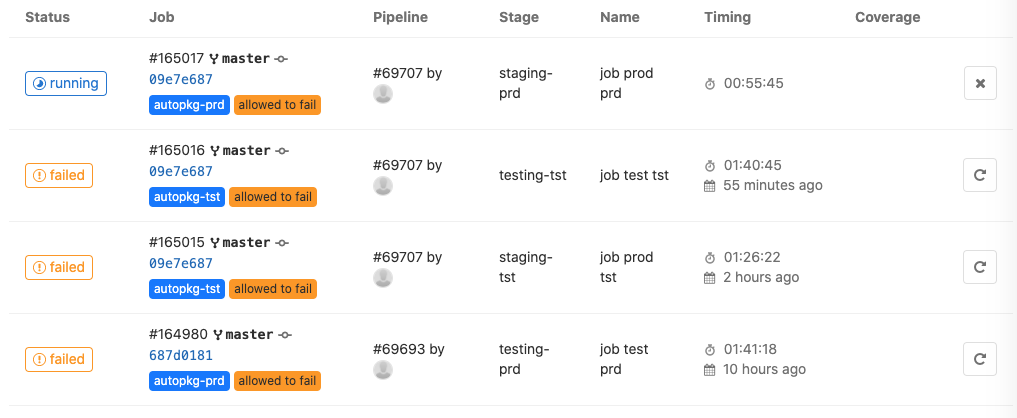
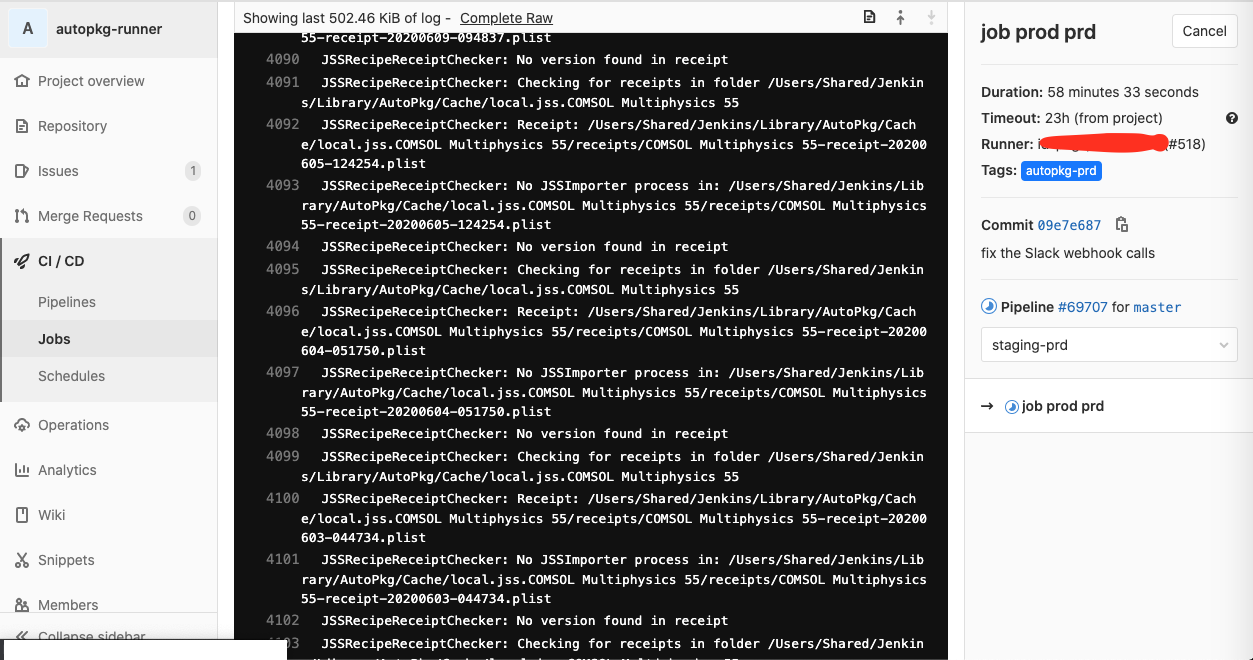
To see the output of a job, click on the “Running”, “Passed” or “Failed” button. Here you see the live output as well as the job’s duration. You can view the raw output with the “Complete Raw” link. There is also a Cancel button.
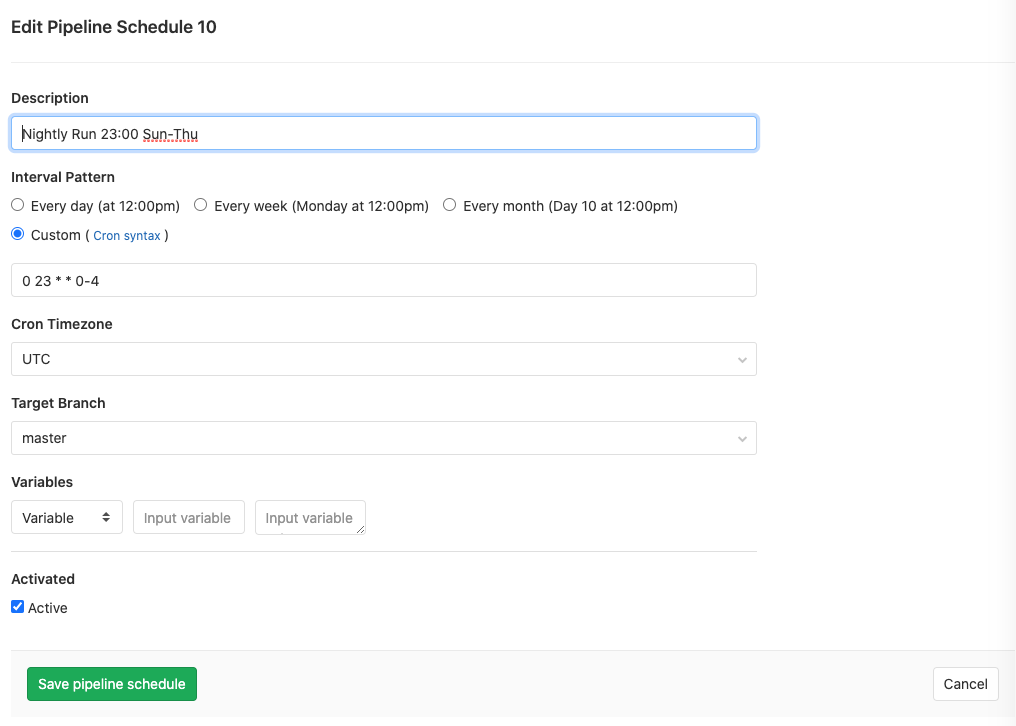
People use GitLab Runners in far more advanced ways than I’ve described here, with triggers from different branches of the repo setting off different pipelines, and so on, and I will be iterating my design as I get more familiar with it. However, all I needed to go productive was to set a nightly schedule. This is easily done in CI/CD > Schedules. Just set a schedule using cron syntax. My example is self-descriptive:
Important Note
GitLab Runners only run on Mac when the user that registered the Runner is logged in to the computer. So, you should set the computer to auto-login, and don’t allow it to sleep. This makes a Gitlab Runner only suitable on a Mac in a secure environment. Our two Mac minis are in an internal server room.